Documentation
Empower Your Business, Simplify Your Sales with Elite POS.
- Version: 1.0
- Author: Dream CoderZ
- Created: 8 March, 2024
- Update: 8 March, 2024
If you have any questions that are beyond the scope of this help file, Please feel free to email via elitepos at dreamcoderz.com .
Server Requirements
Before you install ElitePOS make sure your server meets the following requirements:
- PHP 8.1+
- MySQL 5.6+ or MariaDB 10.0+
- Intl PHP Extension
- OpenSSL PHP Extension
- PDO PHP Extension
- Mbstring PHP Extension
- Tokenizer PHP Extension
- XML PHP Extension
- Ctype PHP Extension
- Fileinfo PHP Extension
- JSON PHP Extension
- GD2 PHP Extension
Installation
Follow the steps below to setup your site template:
Step 1: Uploading the Software
- Extract the ZIP File: Begin by extracting the contents of the downloaded ZIP file.
- Rename and Upload: Unzip the downloaded archive package. Rename the
ElitePOSdirectory to your desired directory name and upload the directory to your web server through FTP or Control Panel
Step 2: Database Creation
- Access Your Hosting Control Panel: Log in to your web hosting control panel.
- Create a New Database: Use the control panel or phpMyAdmin to create a new database.
Step 3: Installation Wizard
- Initiate the Installation: Go to your website address to start the installation wizard.
- Follow the Installation Wizard: Complete the setup following the on-screen instructions.
Run Installation Wizard
Go to your website address, then you'll see an installation wizard.
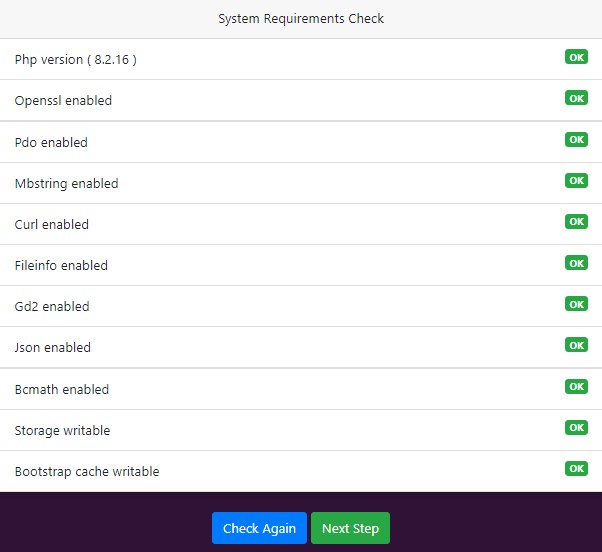
- Review Server Requirements: The wizard will check if your
server meets the requirements for running ElitePOS.
- Directories within the
storageand thebootstrap/cachedirectories should be writable by your web server or ElitePOS will not run. - The list includes the required PHP version and necessary extensions like OpenSSL, PDO, Mbstring, etc.
- Each requirement will show an 'OK' status if met.
- Directories within the
- Troubleshoot if Needed: Resolve any issues if any requirements are not met before proceeding.
- Confirm and Proceed: Click 'Next Step' to continue with the installation once all checks are passed.
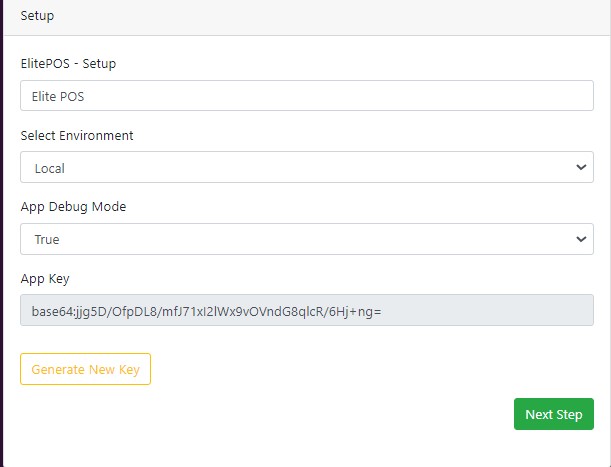
- Enter Setup Details: On the setup screen, configure the initial
settings as follows:
- Select Environment: Choose 'Local' for development or 'Production' for a live site.
- App Debug Mode: Set to 'True' for development to display errors. Set to 'False' for production.
- App Key: An encryption key is provided. Click 'Generate New Key' to refresh it.
- Proceed to Next Step: Click 'Next Step' to continue after configuring the settings.
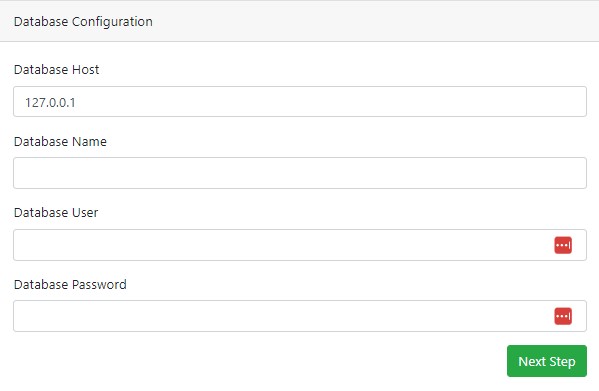
This step is crucial as it links ElitePOS with your database where all data will be stored.
- Database Host: Typically
127.0.0.1for local installations, or as provided by your hosting service. - Database Name: Enter the name of the database you've created for ElitePOS.
- Database User: Input the username that has rights to access and manage the database.
- Database Password: The password associated with your database user.
Enter the database details and press the Next Step button to connect ElitePOS to your database.

In this stage, you will establish the administrative credentials for accessing ElitePOS.
- Username: Enter a desired username that you will use to log in to the ElitePOS dashboard.
- Password: Choose a secure password. Use a combination of letters, numbers, and special characters.
- Confirm Password: Retype your password to ensure there are no mistakes.
Once all fields are filled, click the Complete Installation button to finalize the ElitePOS installation process.
Admin Panel
Comprehensive Guide and Practical Examples for Navigating the ElitePOS Admin Panel
Admin Users Menu
Access the "Admin Users" menu from the sidebar to manage user accounts and their roles. There are two main sections under this menu:
- Users: Here you can add, view, and edit user accounts.
- Roles: This section allows you to create and manage the roles and permissions for users.
Managing Users
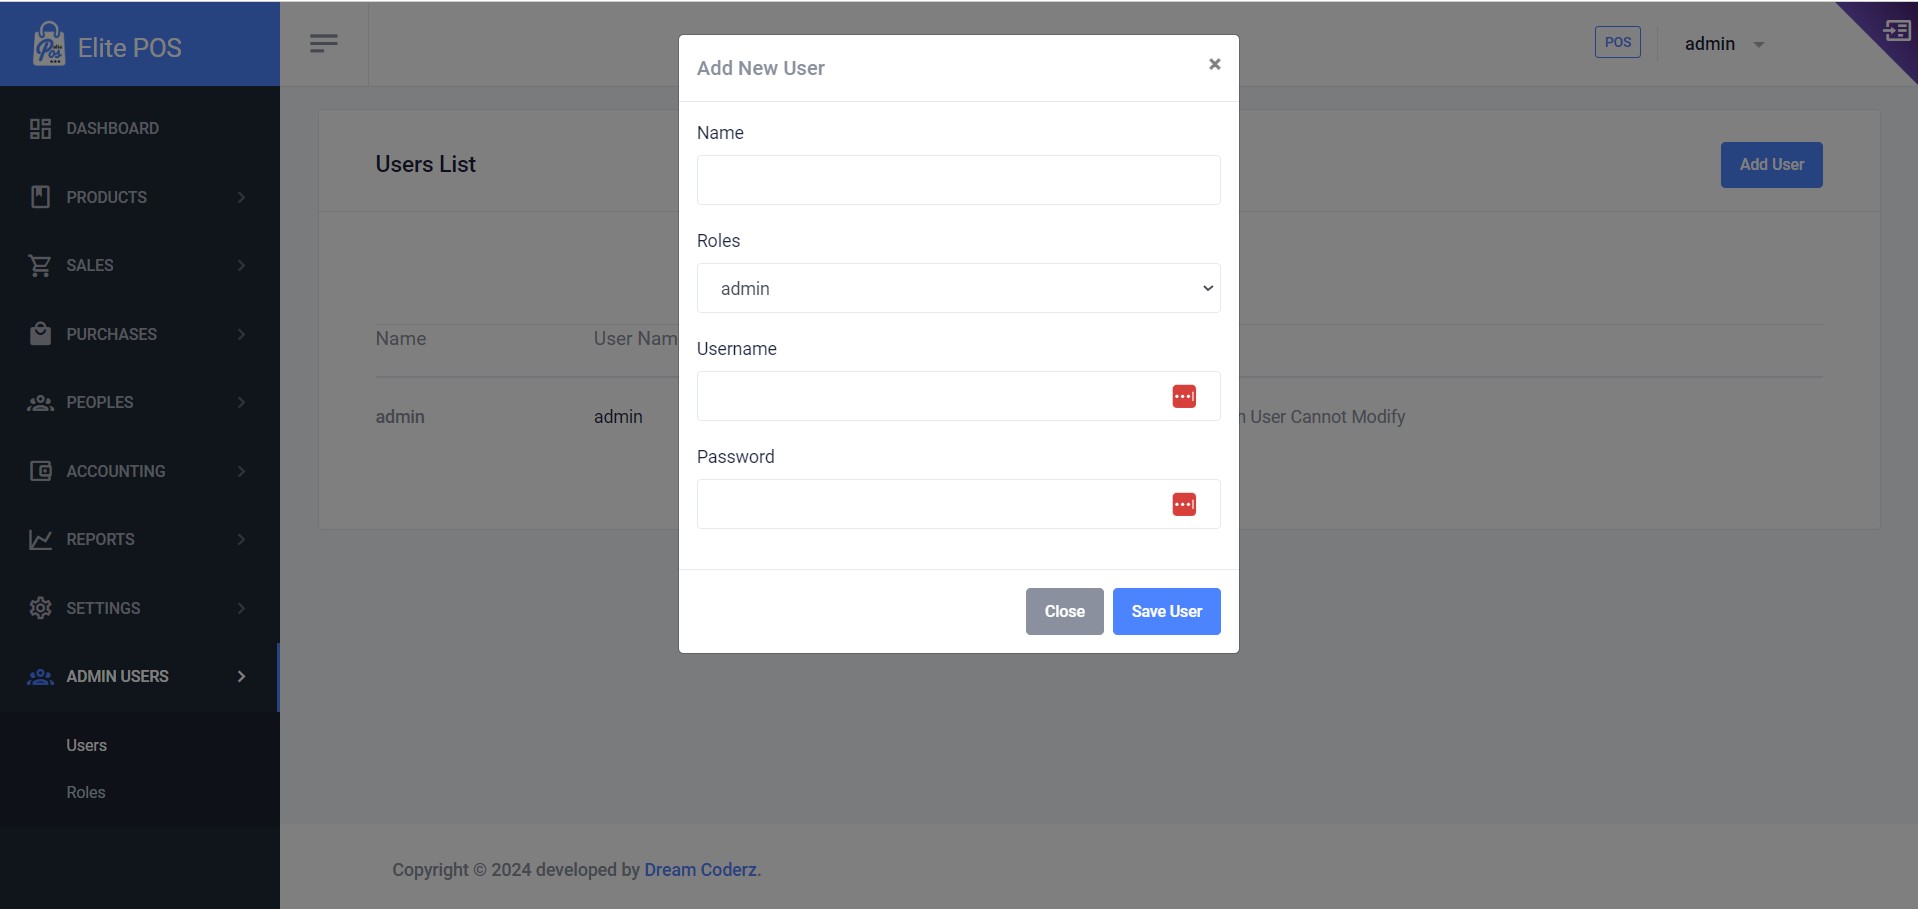
Adding a New User
To add a new user to the system:
- Navigate to the Admin Users menu on the sidebar and select Users.
- Click on the Add User button at the top right corner of the Users List.
- Fill out the form with the new user's information.
- Once all information is filled in, click Save User to create the new user account.
Editing User Information
To edit an existing user's details:
- Locate the user in the Users List under the Admin Users > Users section.
- Click the edit button (usually represented by a pencil icon) next to the user's name.
- Make the necessary changes in the user's profile.
- Click Save to update the user details.
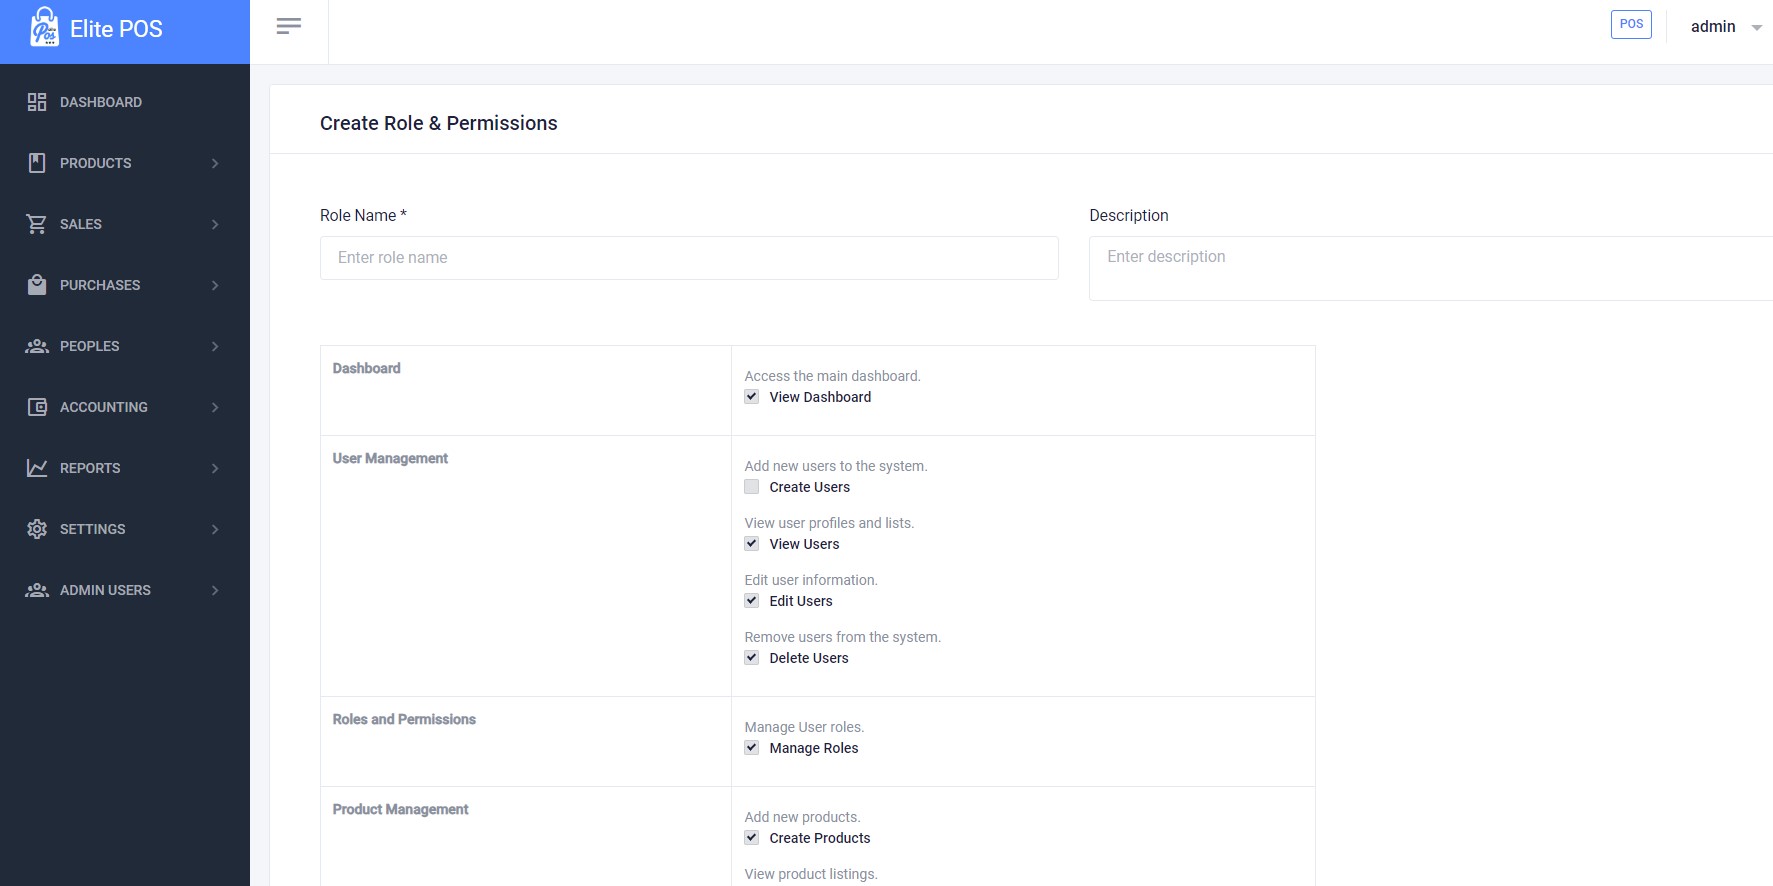
Managing Roles and Permissions
Viewing and Editing Roles
Roles define the permissions and access levels for different users. To manage roles:
- From the Admin Users menu, select Roles.
- You will see a list of all existing roles. To modify a role's permissions, click on the role's name.
- Under each section (e.g., Dashboard, User Management), check the boxes next to each permission you wish to grant to this role.
- After selecting all desired permissions, click Save to create the new role.
Tips and Best Practices
- Always make sure that roles and permissions align with the user's job responsibilities.
- Regularly review user access levels to maintain security and operational efficiency.
- Use descriptive names and descriptions for roles to make it easier to assign and manage permissions.
Elite POS Dashboard Overview
Introduction
The Dashboard is the home screen of the Elite POS system, providing a quick overview of the key metrics and activities of your business. It contains various sections that display sales and purchase figures, sales trends, top-selling products, top customers, and recent orders.
Key Sections of the Dashboard
Total Sales Metrics
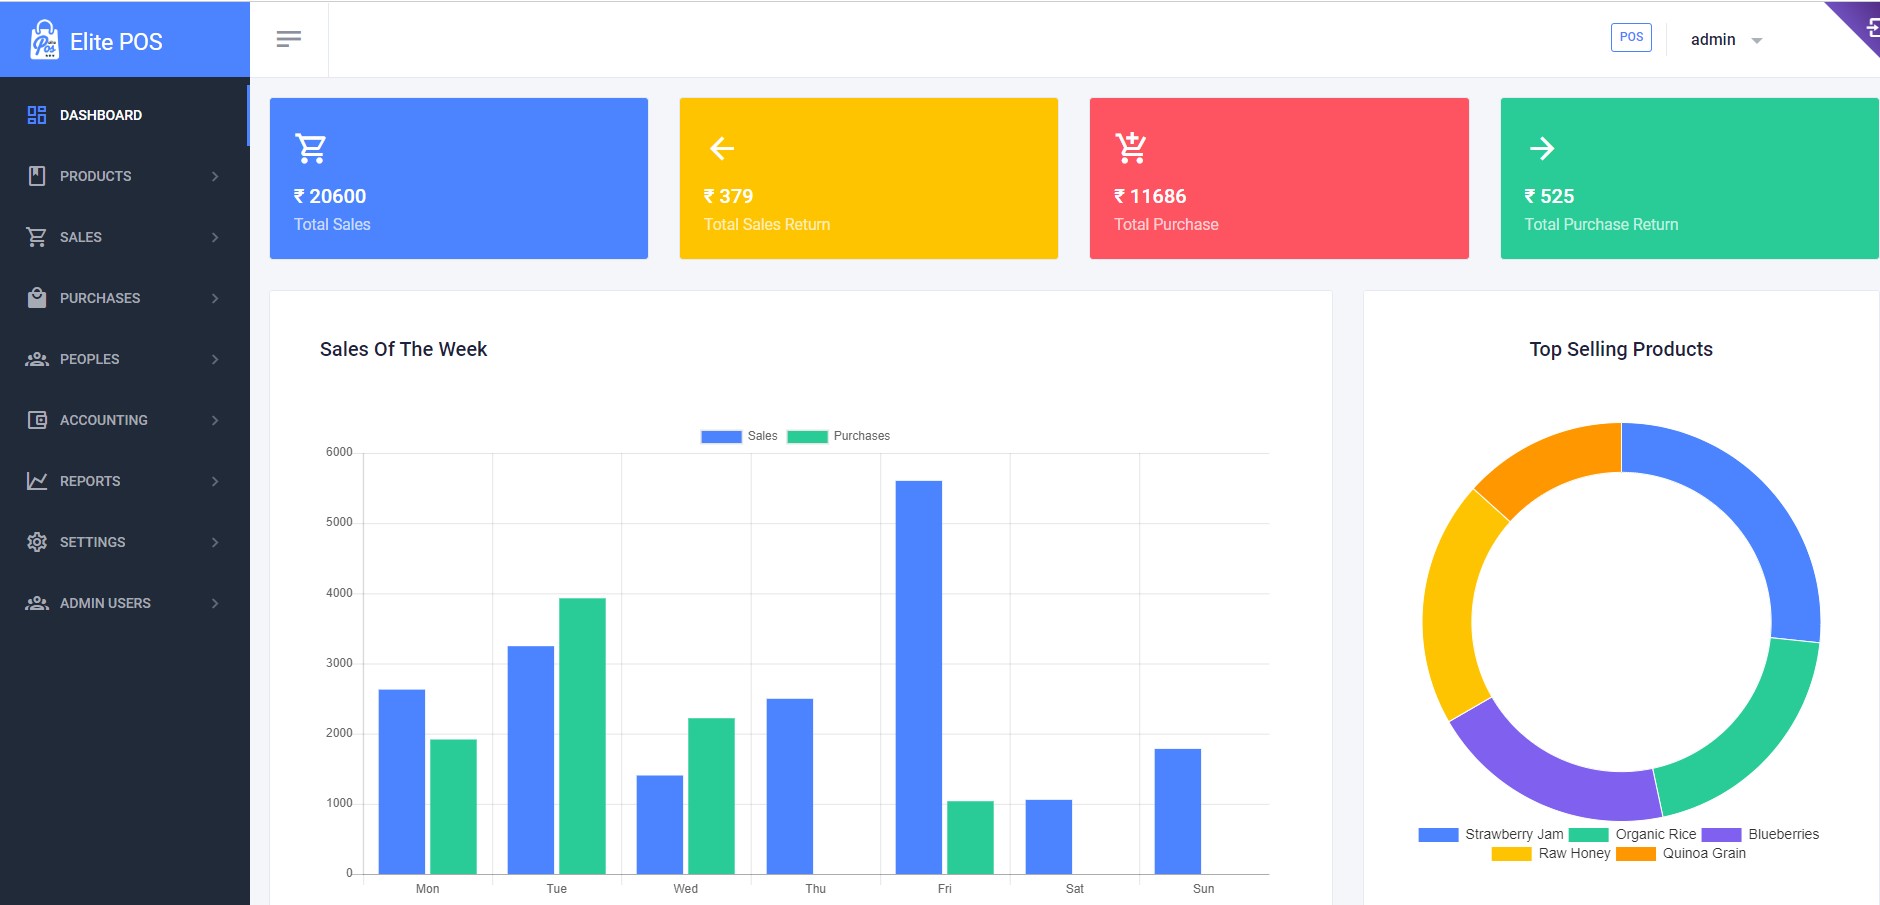
Total Sales, Total Sales Return, Total Purchase, and Total Purchase Return figures are shown here.
Sales of the Week
This bar chart provides a visual comparison of sales and purchases made over the week.
Top Selling Products
The pie chart illustrates the proportion of sales per product.
Top Customers
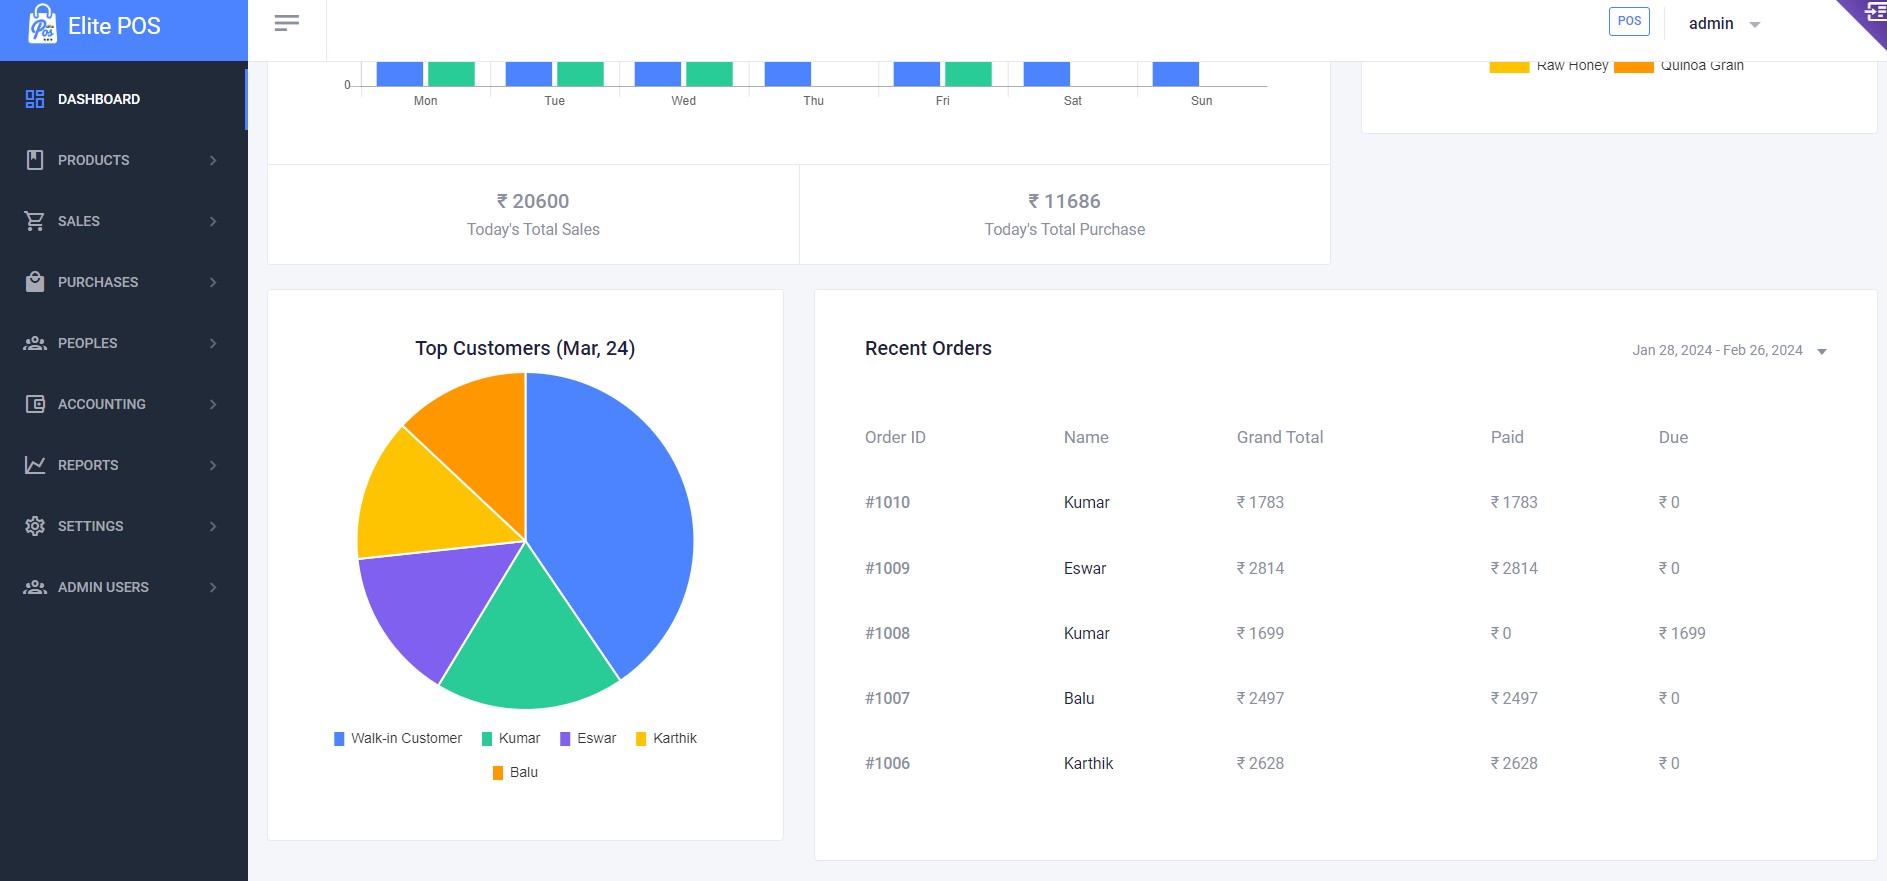
This pie chart represents your top customers and the percentage of sales each contributes to your business.
Recent Orders
A tabulated list that gives you a quick snapshot of the latest completed orders.
Navigating the Dashboard
Learn how to interact with the dashboard elements to get the most detailed and relevant business insights.
Tips for Using the Dashboard
- Start your day by checking the Dashboard to get an insight into your business's performance.
- Use the sales trends to plan for stock replenishment and anticipate busy periods.
- Identify your best customers and products to tailor your marketing and sales strategies.
Conclusion
The Dashboard is a powerful tool that helps you stay informed about your business's performance with just a glance. By regularly checking your Dashboard, you can make data-driven decisions to improve your sales and customer relations.
Elite POS Product Management
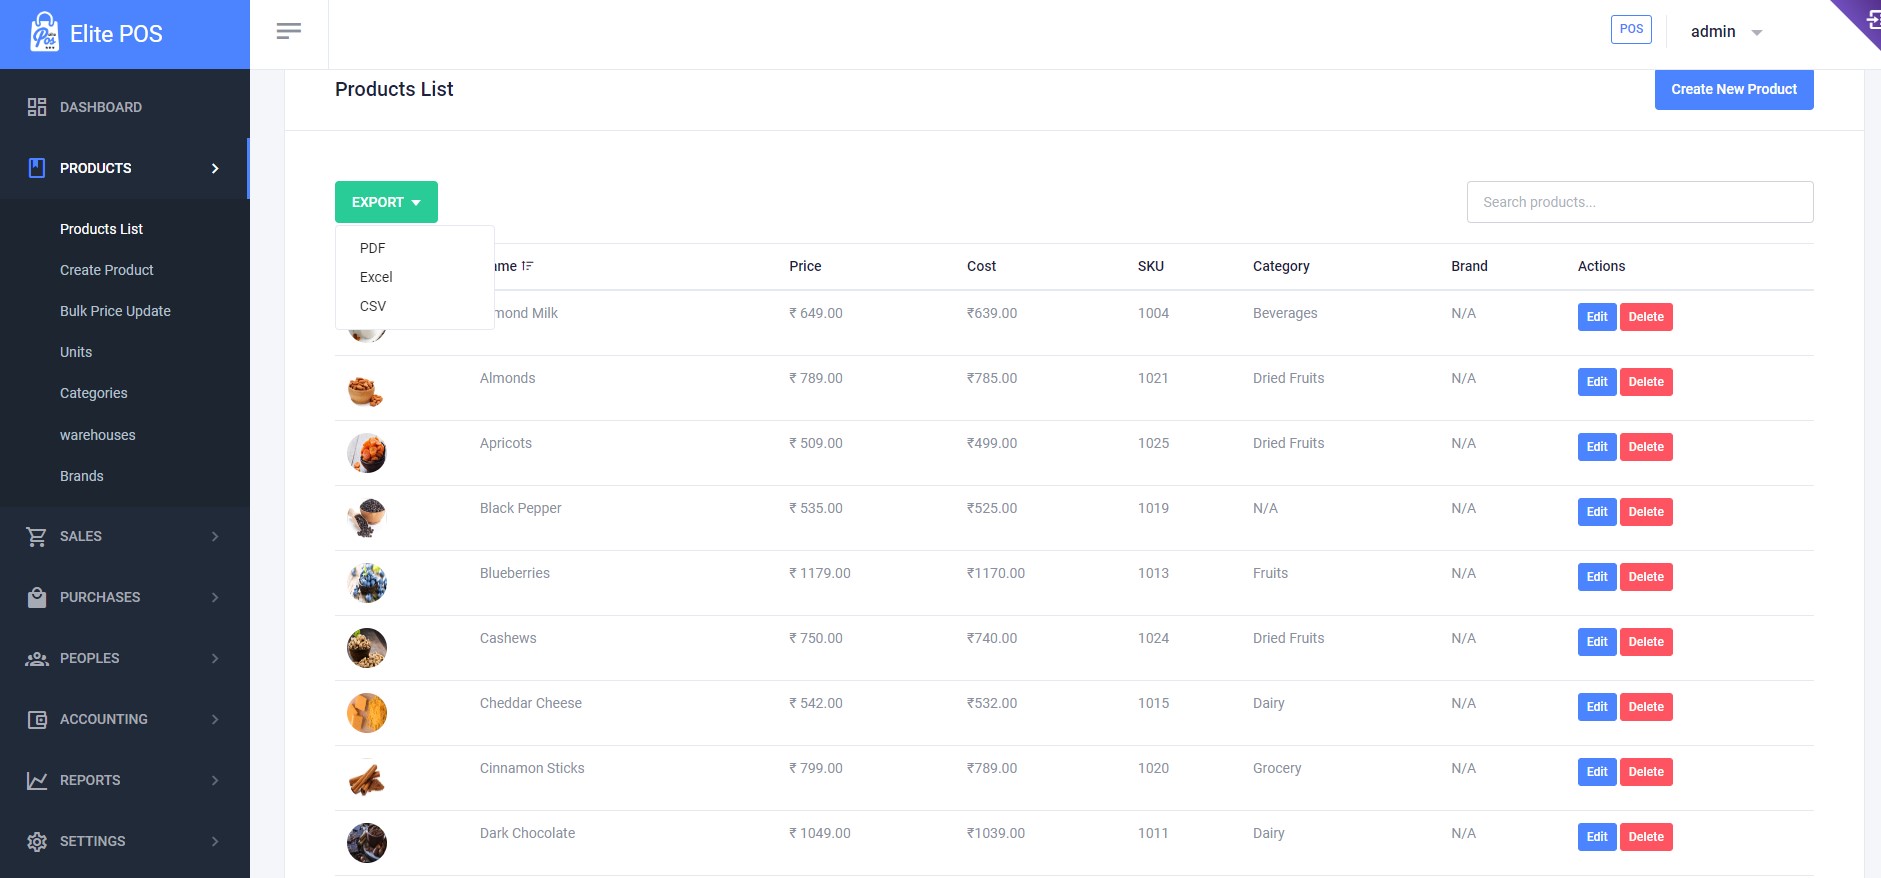
Products List
View all the products in your inventory, along with details like price, cost, SKU, category, and brand. Actions such as Edit and Delete are also available for each product.
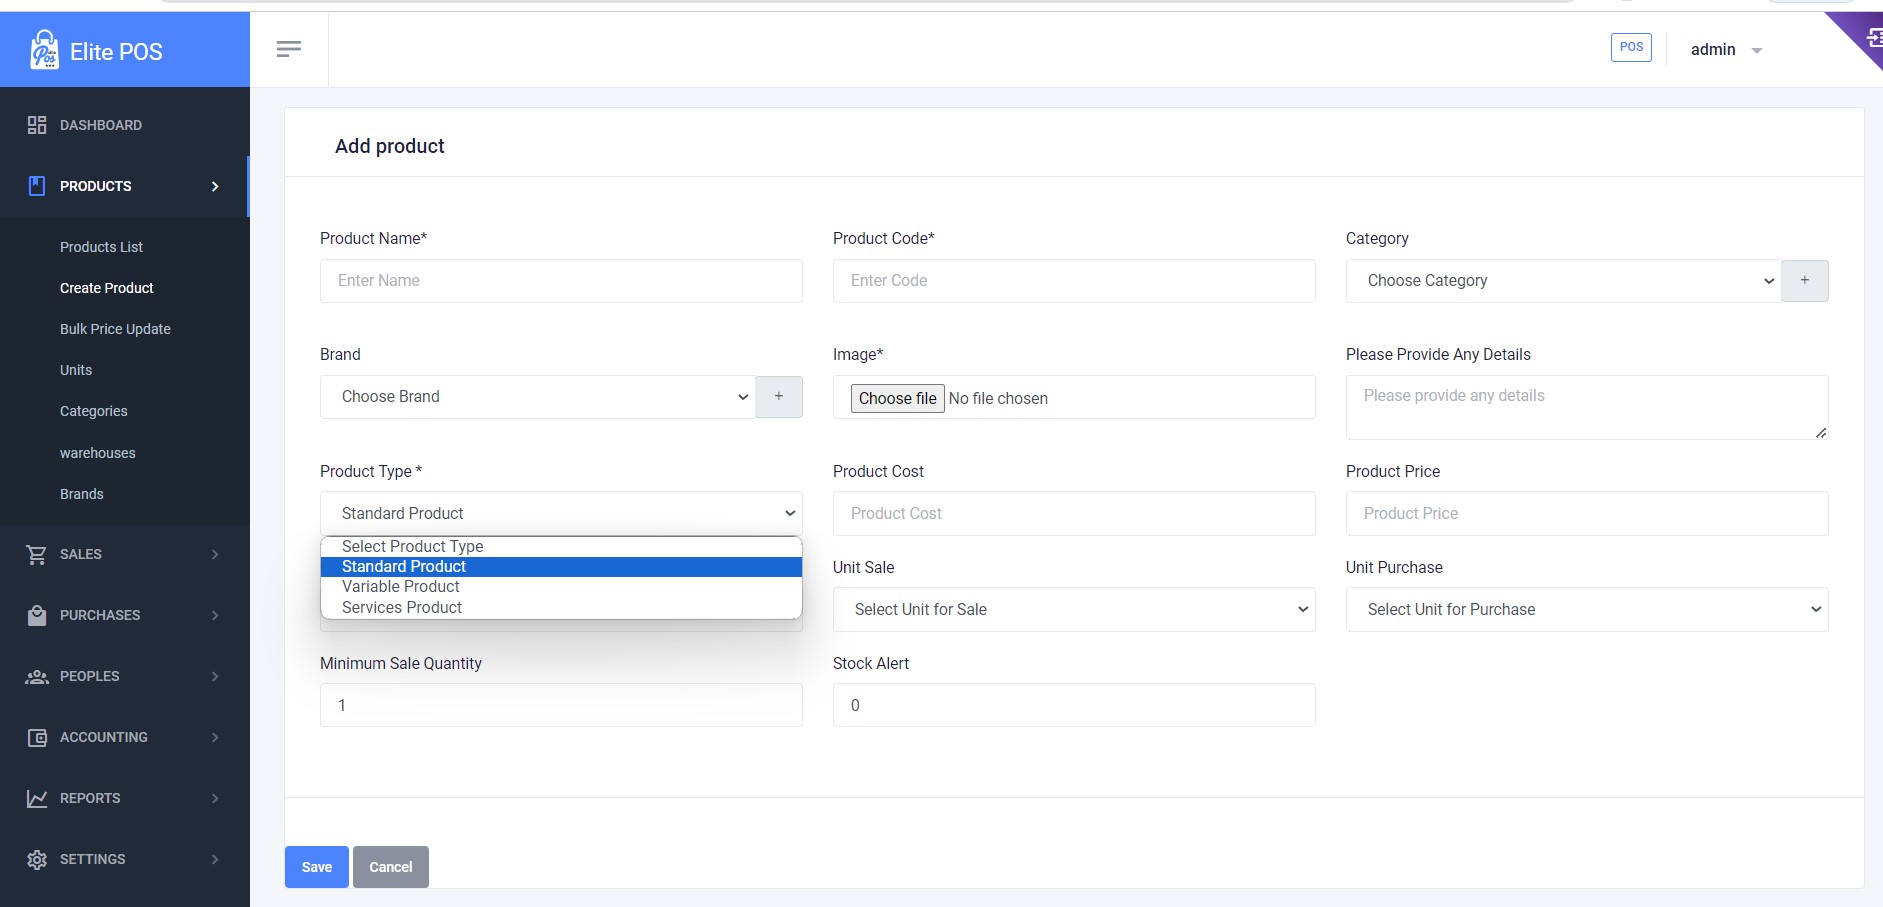
Add Product
To add a new product to your inventory, fill out the required fields such as product name, code, category, cost, price, and add an image. Select whether it's a standard, variable, or service product and set minimum sale quantity and stock alert level.
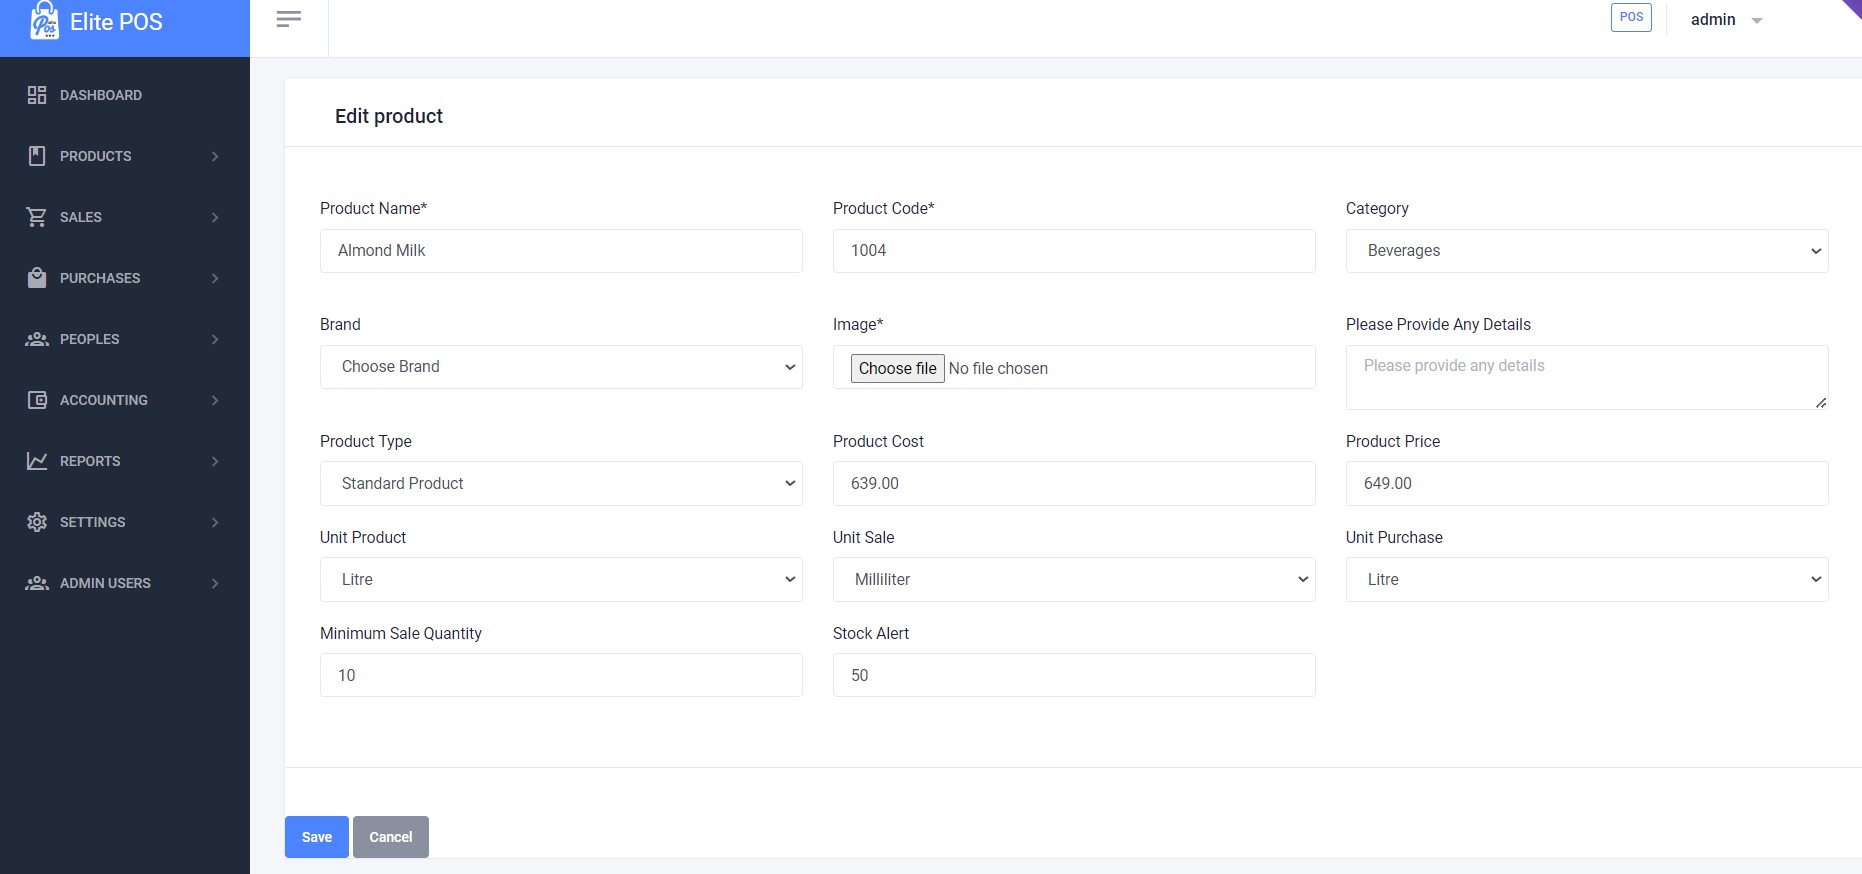
Edit Product
Edit the details of an existing product. You can change any of the product's information, such as name, code, brand, price, and stock details. Save the changes to update the product information in your inventory.
Units
Manage the units of measure for products. Add new units, or edit and delete existing ones.
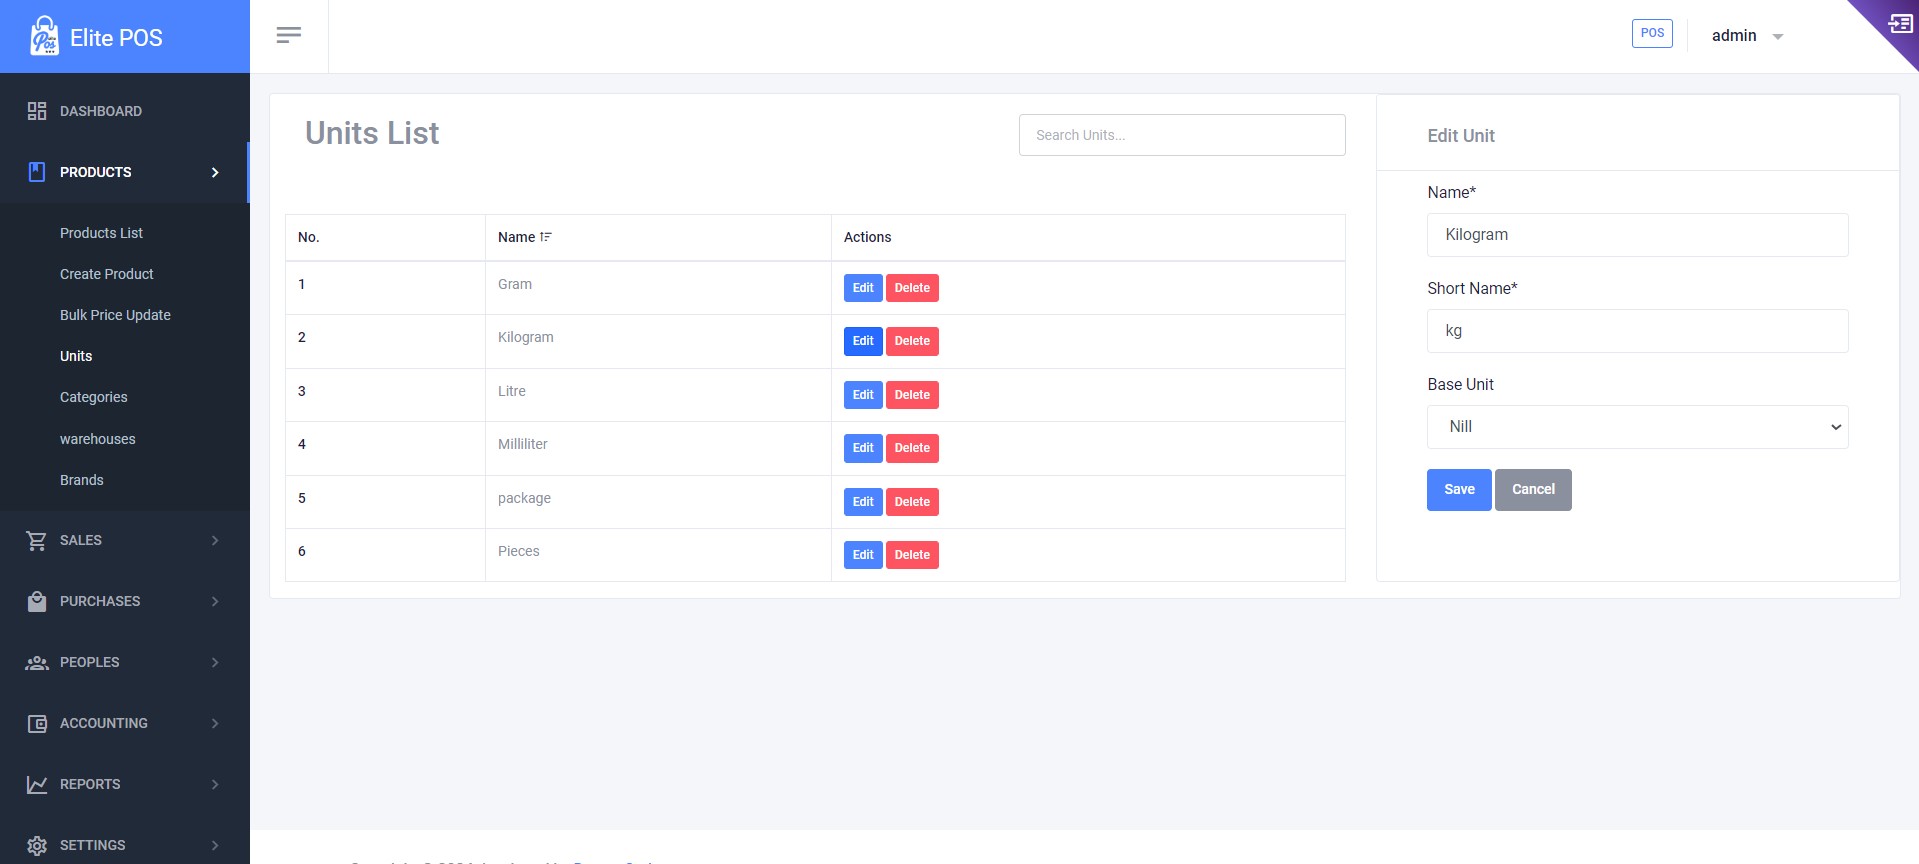
To add a unit, fill in the name and short name, then click "Save". Use the search bar to find units and the edit/delete buttons to modify the list.
Categories
Define and manage product categories, including nested categories with parent-child relationships.
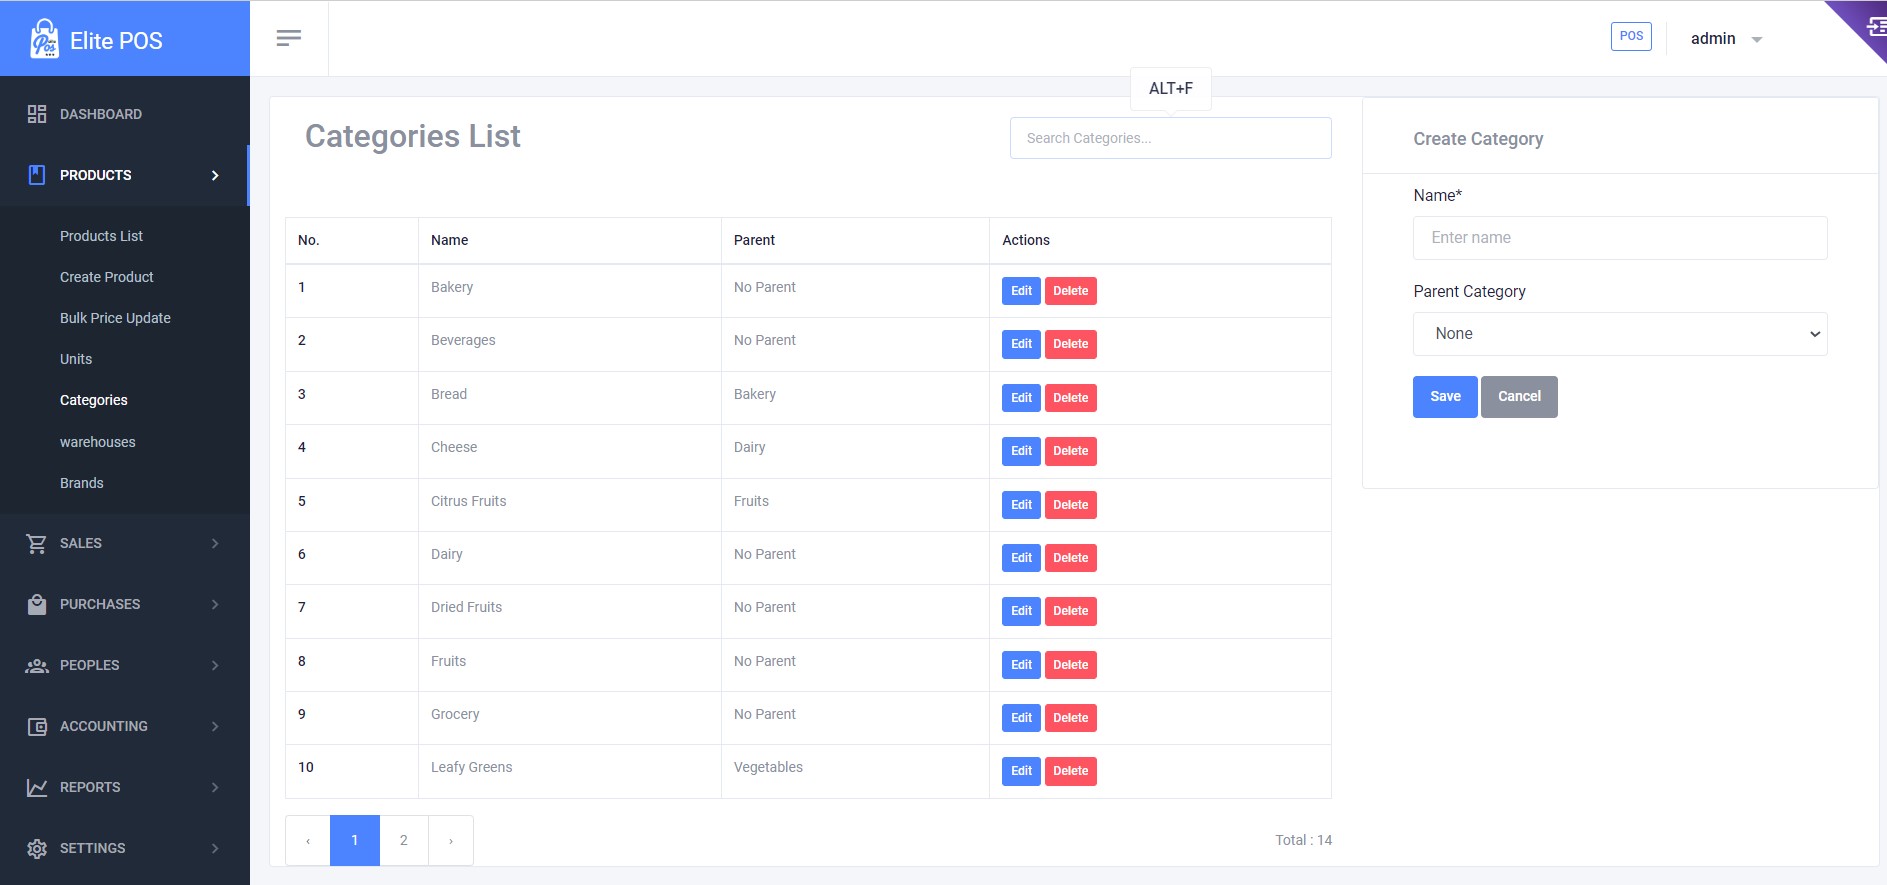
To create a category, enter a name and select a parent category if applicable. Edit or delete categories using the actions column.
Warehouses
Control your stock by managing your warehouses. Add, edit, or delete warehouse information as your logistics change.
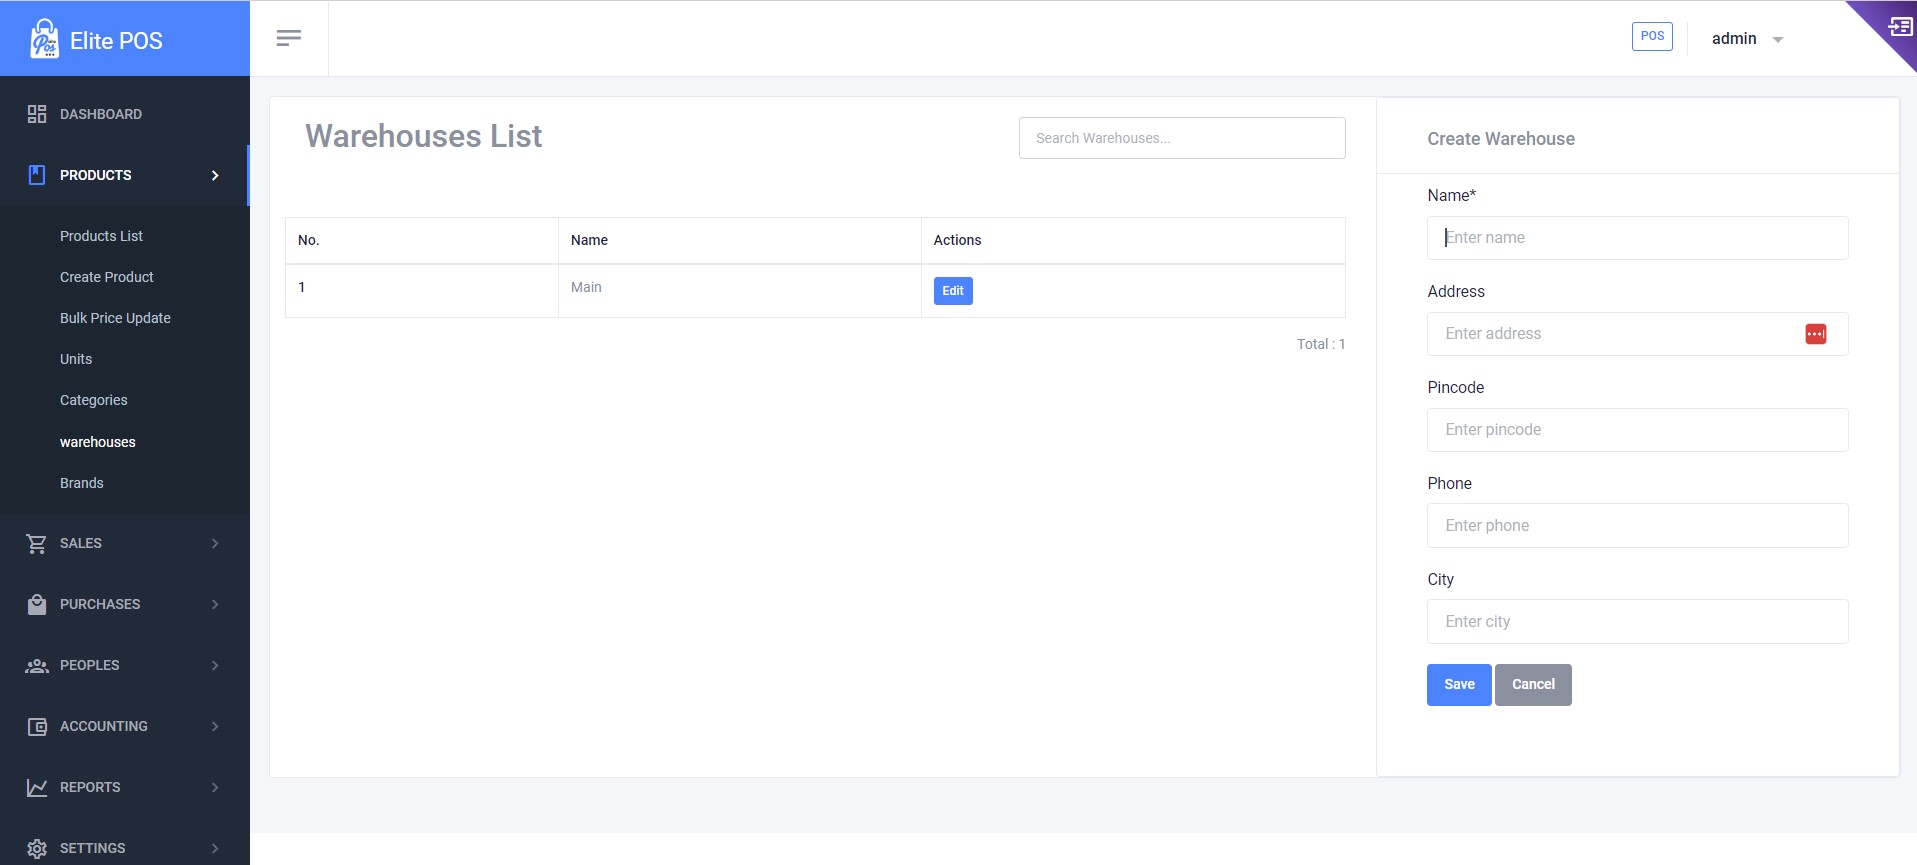
Enter the warehouse name, address, and contact information to add a new warehouse. Maintain your warehouse records with the provided edit and delete options.
Brands
Keep track of all product brands. Insert a new brand, or edit and delete entries as needed.

Adding a brand is simple: just type the brand's name and optionally upload an image. You can manage the list with the edit and delete options.
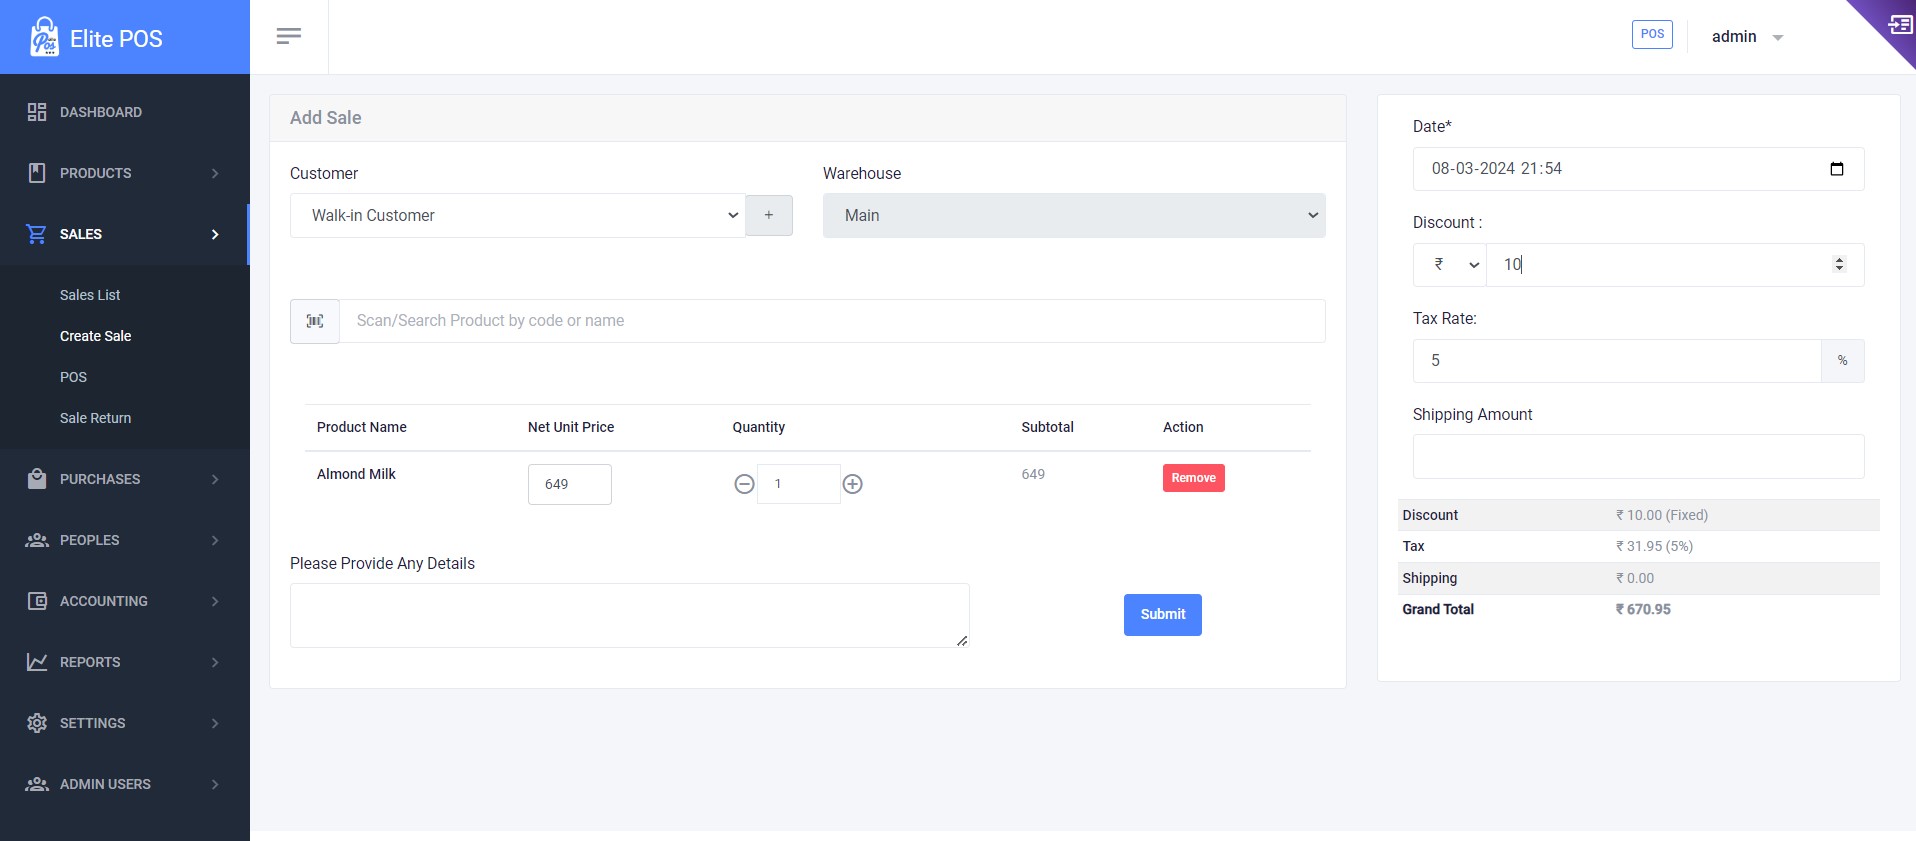
Add Sale
To record a new sale, fill in the product details, apply discounts and taxes, and capture customer information.
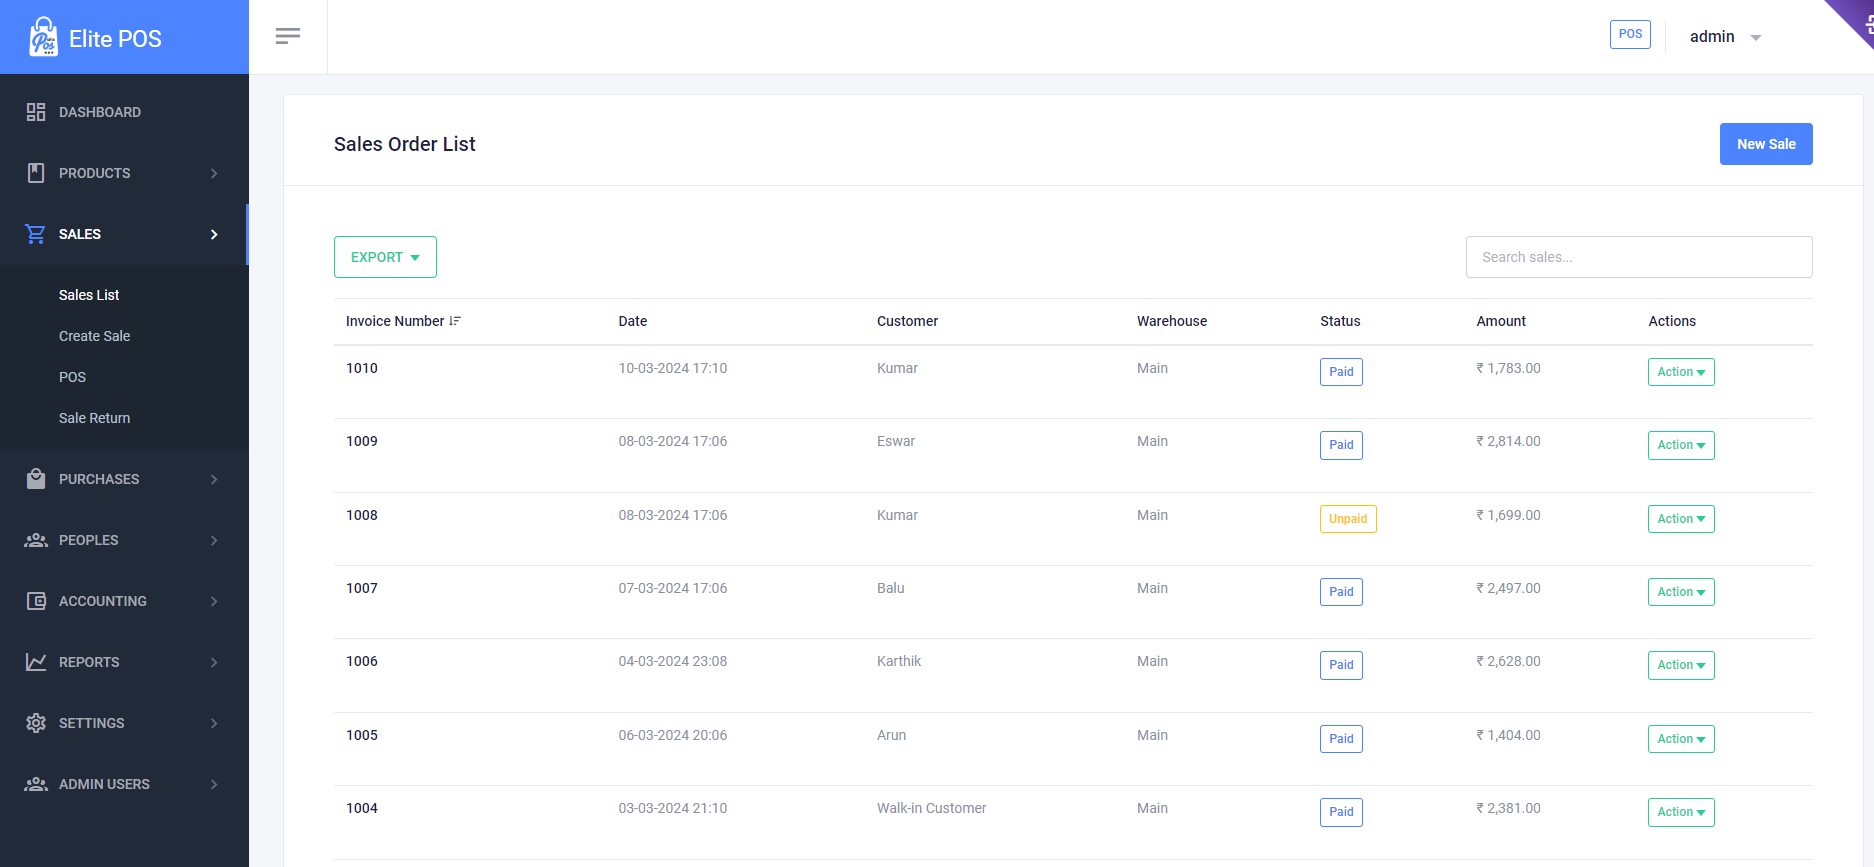
Sales List
Review all past sales transactions. You can filter the list, view detailed information, and perform actions such as processing returns or printing receipts.
Sales Return
When a customer returns a product, use the Sales Return feature to record the transaction. This feature allows you to select the original sale from the sales list, specify the items being returned, and process the return accordingly. The inventory will be updated to reflect the returned items, and the customer’s balance will be adjusted, whether it’s a refund or store credit.
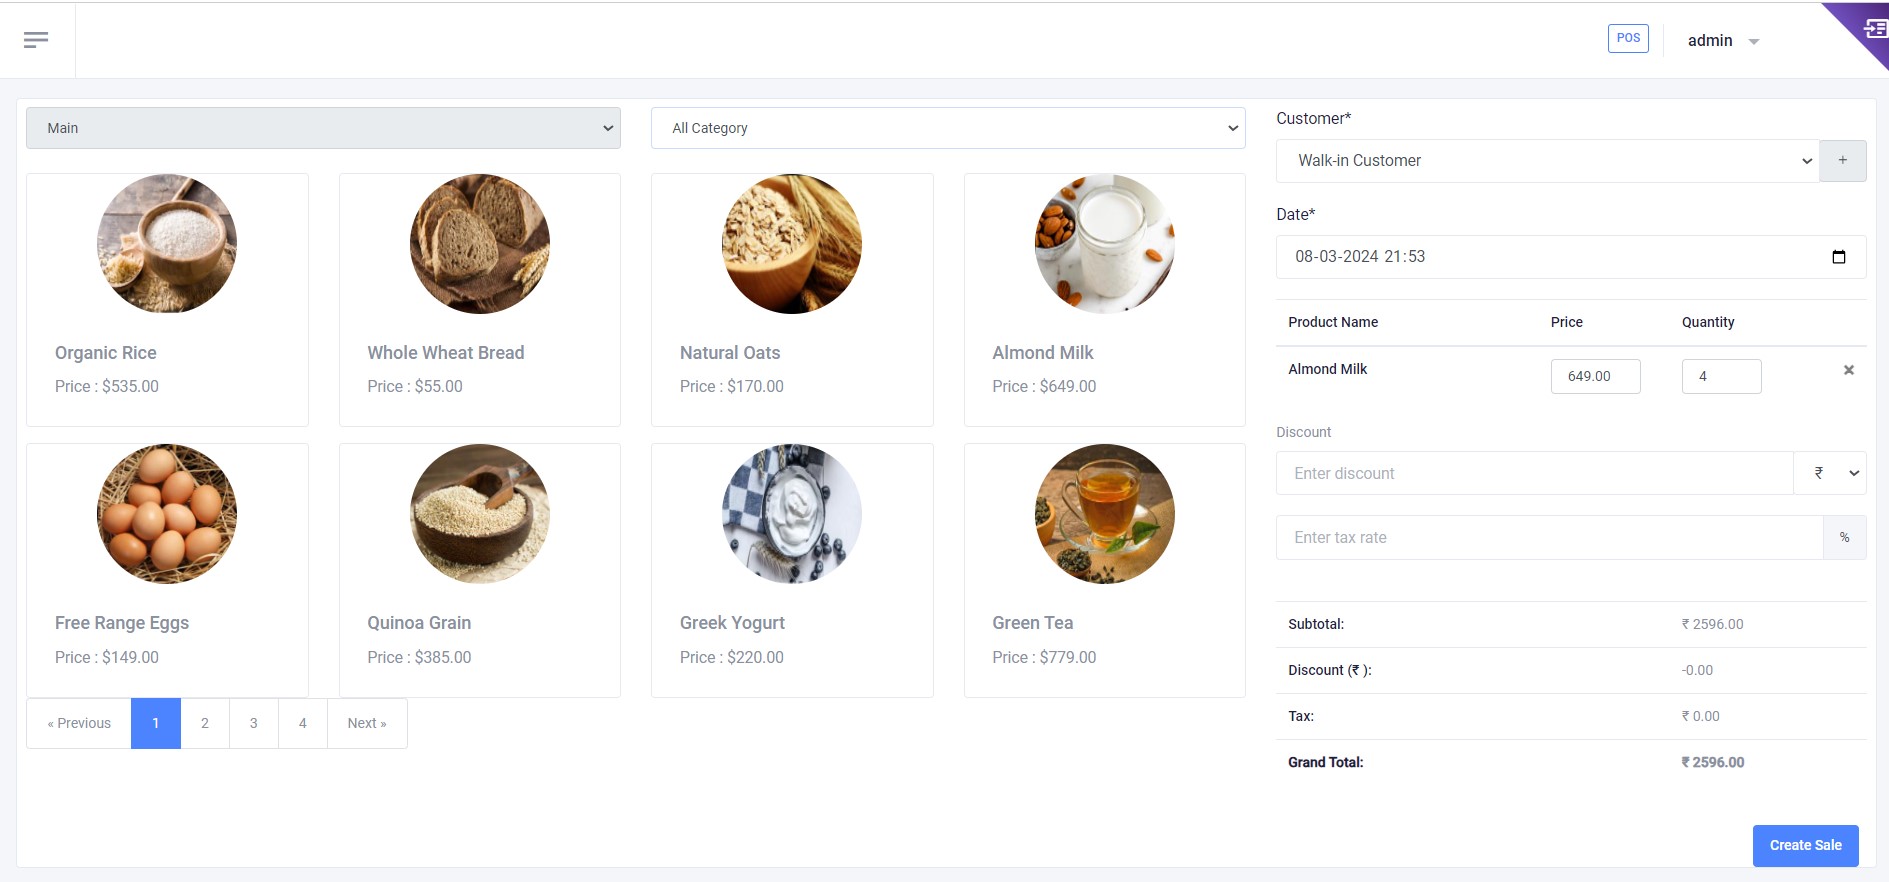
POS
Point of Sale (POS)
The POS screen allows for efficient transaction processing. Select a customer, input the sale details, and complete transactions seamlessly.
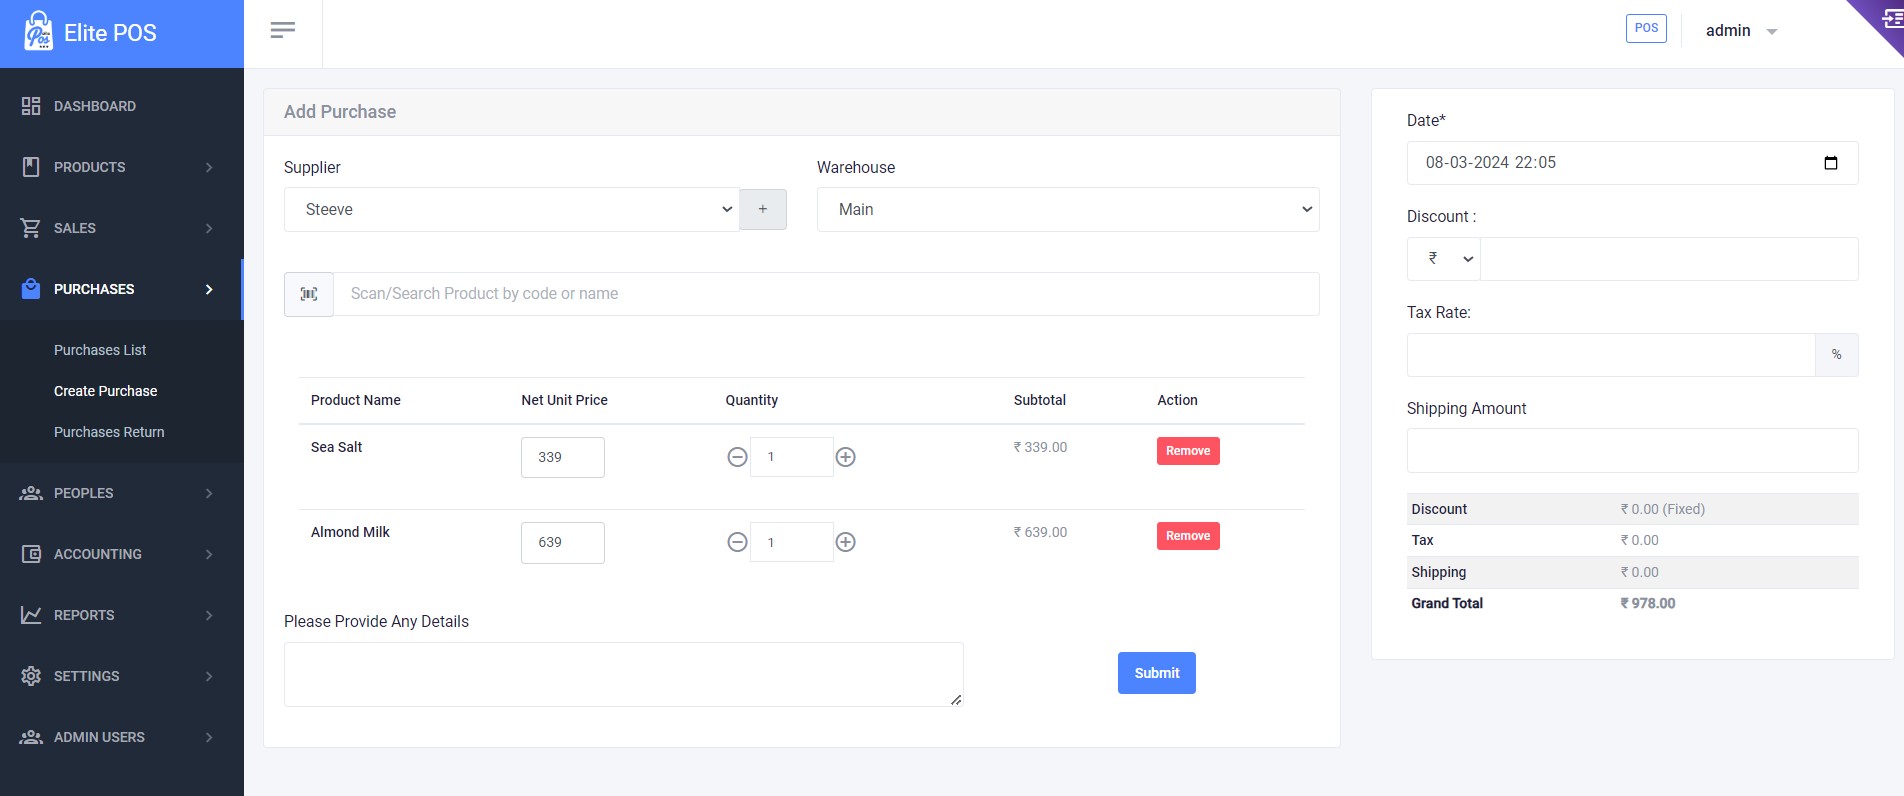
Purchase
The Purchase module is used to record products that your business buys from suppliers. Here, you can enter the details of the products, quantities purchased, cost prices, and related expenses. It helps in managing the stock levels and updating the inventory records. You can also track payments to suppliers and maintain a history of purchases for reference and financial accounting.
Purchase Return
If you need to return items to a supplier, the Purchase Return functionality allows you to create a record of the return transaction. Similar to sales return, you select the original purchase entry, enter the details of the items being returned, and confirm the return. The inventory is automatically adjusted, and any changes to accounts payable or refunds received from the supplier are accurately reflected in the system.
Create Stock Transfer
Use this feature to transfer stock between warehouses. Select the 'From Warehouse' where the stock is currently located, and the 'To Warehouse' where the stock needs to be sent. Scan or search for the product by code or name, enter the quantity to be transferred, and submit the transfer for processing. This ensures accurate tracking and allocation of stock across your business locations.
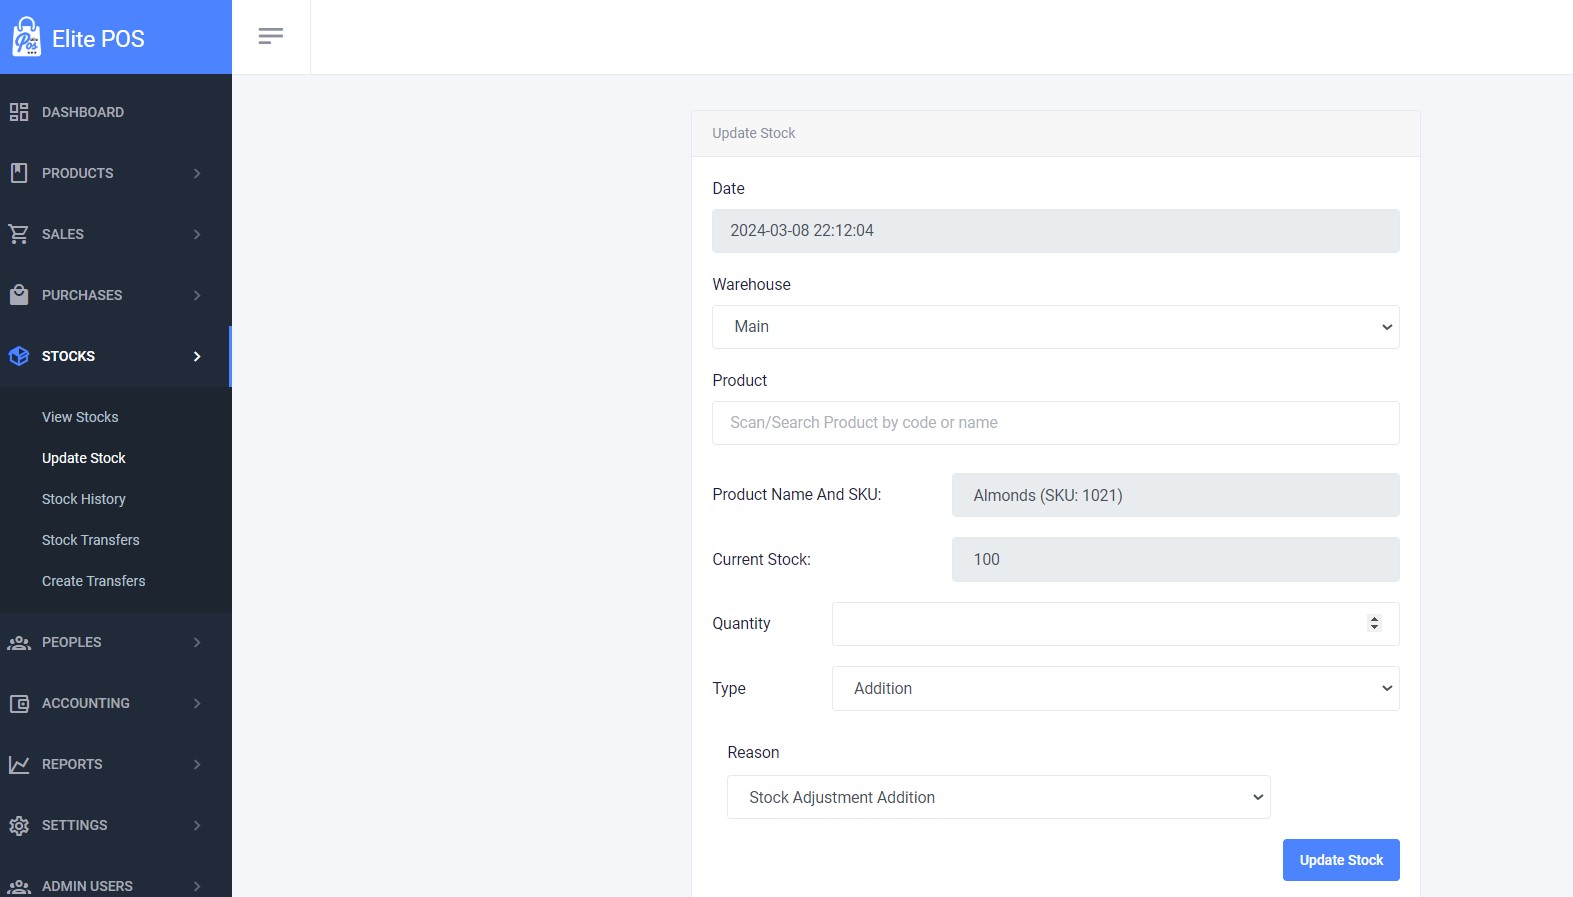
Update Stock
The Update Stock function allows you to modify the stock levels of your products. Choose the relevant warehouse and product, then specify the quantity and whether the update is an addition or subtraction to current stock levels. You can also provide a reason for the stock update, which is useful for maintaining clear records for stock adjustments, such as inventory audits or corrections.
Customers
The Customers List allows you to manage your customer information. Here, you can add new customers, or edit and delete existing customer records. Each customer's contact information is stored, which can be used for sales transactions, marketing efforts, and maintaining customer relations.

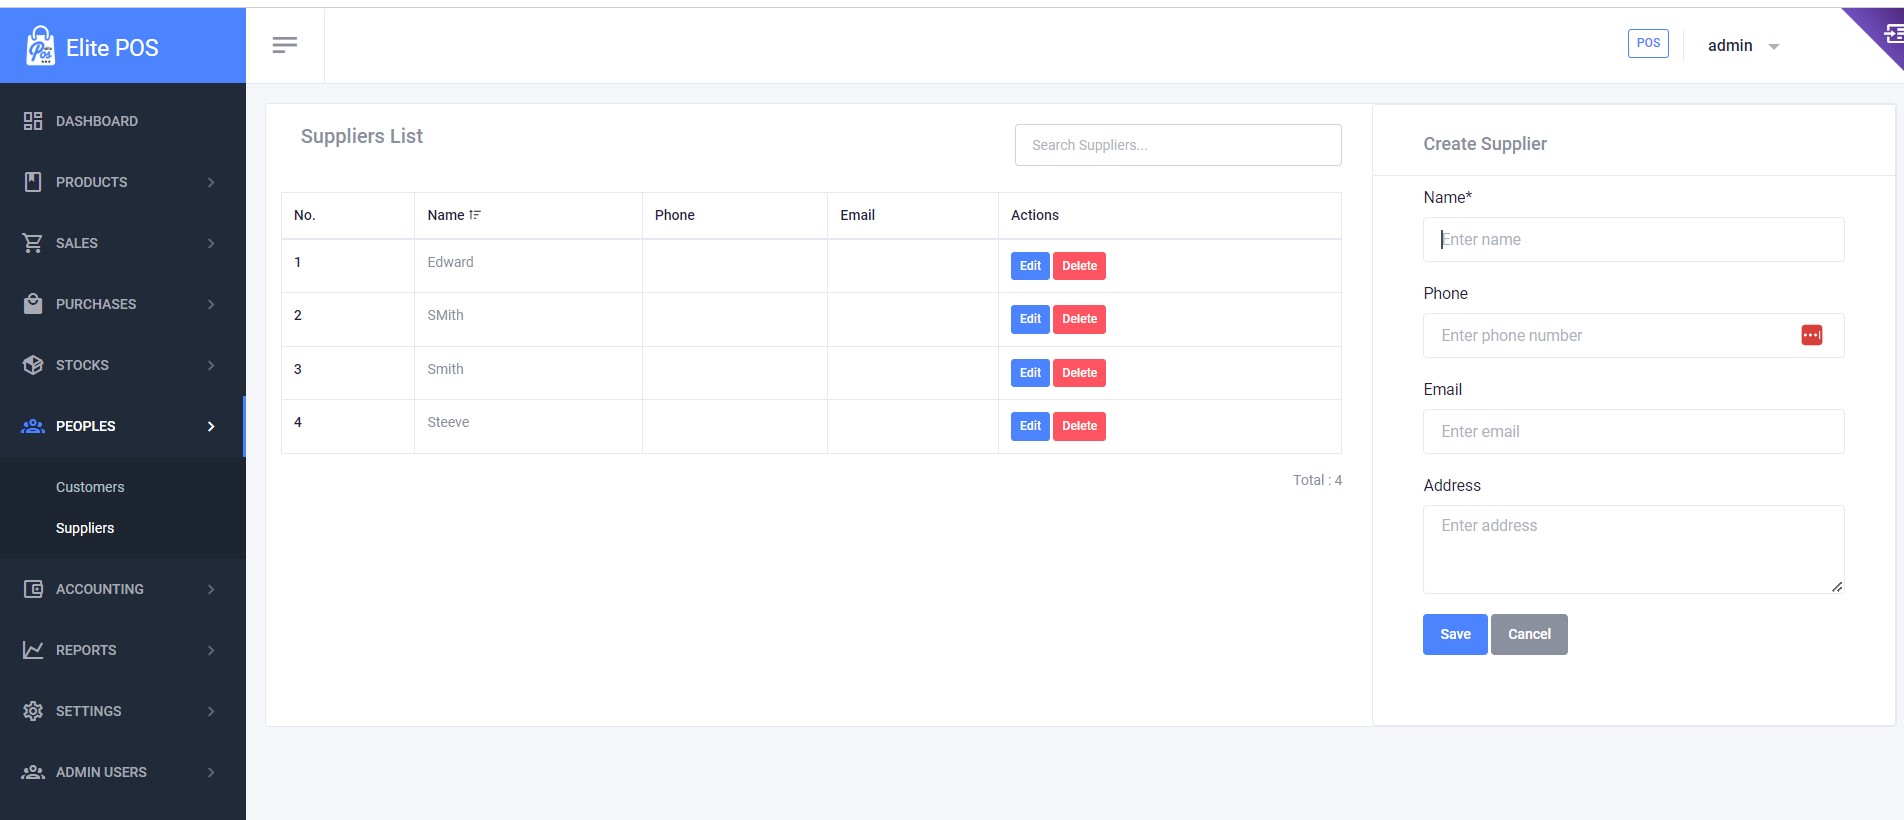
Suppliers
The Suppliers List is where you can maintain data on your suppliers. This includes adding new supplier details, editing information, or removing suppliers from your list. Keeping your suppliers' information up to date is essential for inventory management and ordering new stock.
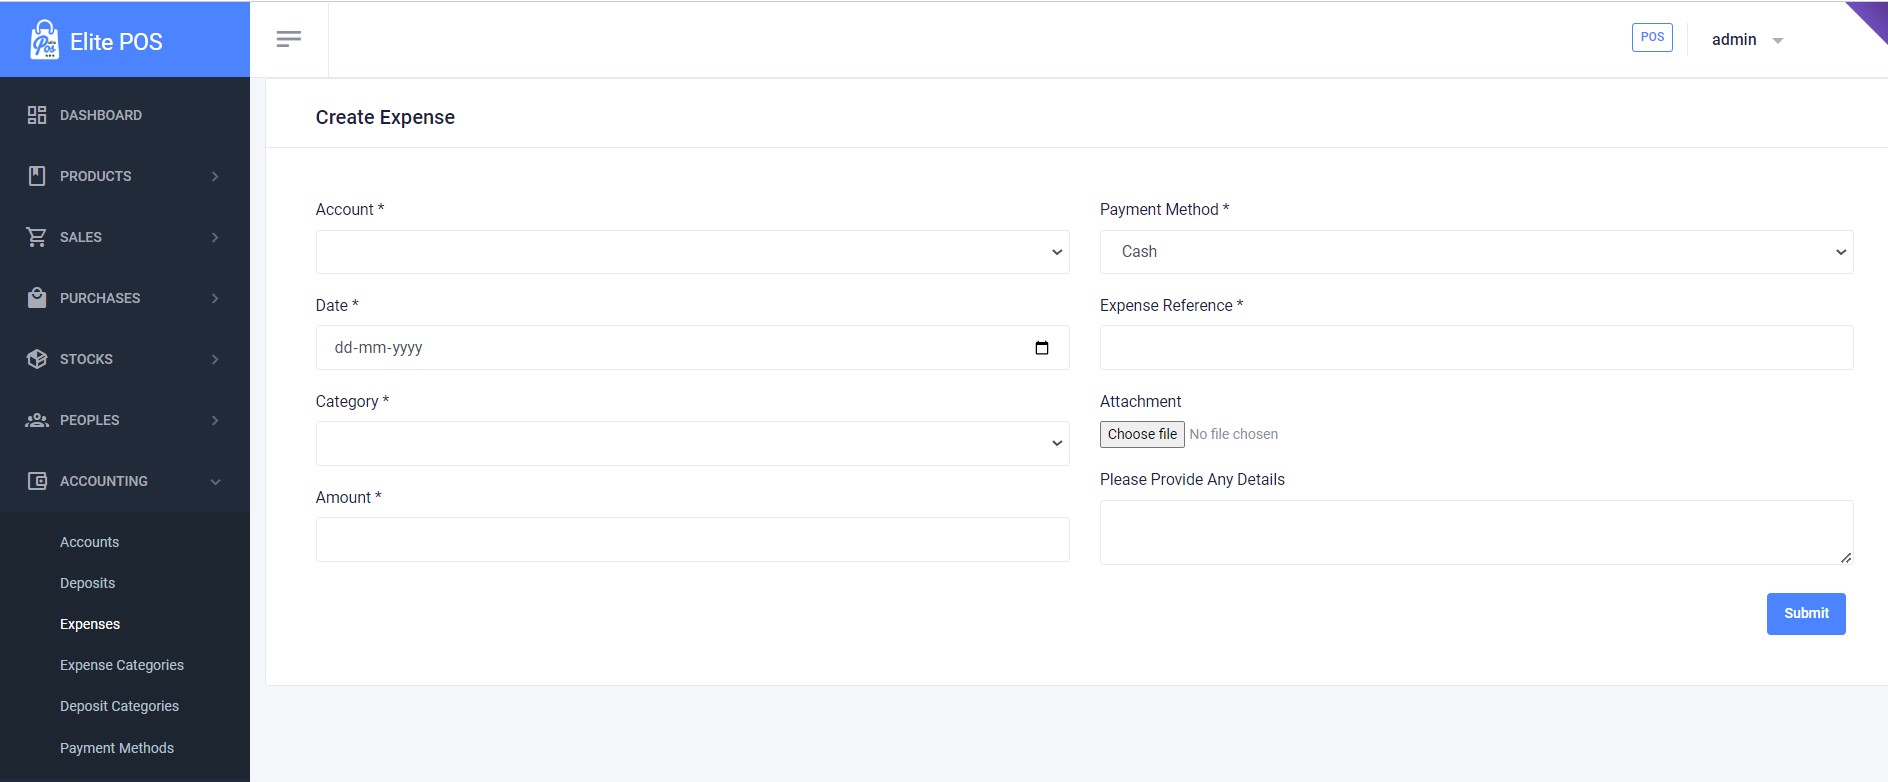
Expenses
In the Create Expense section, you can record and manage your business expenses. It allows you to categorize expenses, choose payment methods, and add detailed notes for accounting purposes. This feature is crucial for tracking operational costs and financial planning.
Reports
The Reports module provides comprehensive insights into various aspects of your business. You can generate sales reports, purchase reports, inventory reports, and financial reports, among others. These reports are crucial for analyzing business performance, making informed decisions, and strategic planning. They can be customized based on date ranges, categories, and other relevant criteria.
Settings
System Settings
System settings allow you to configure the basic and essential details of your POS system. You can set the default currency, input your company information such as the name, email, VAT, and address, and even define your default warehouse and customer settings for sales and purchases. This is the foundational setup that tailors the POS system to your business's needs.
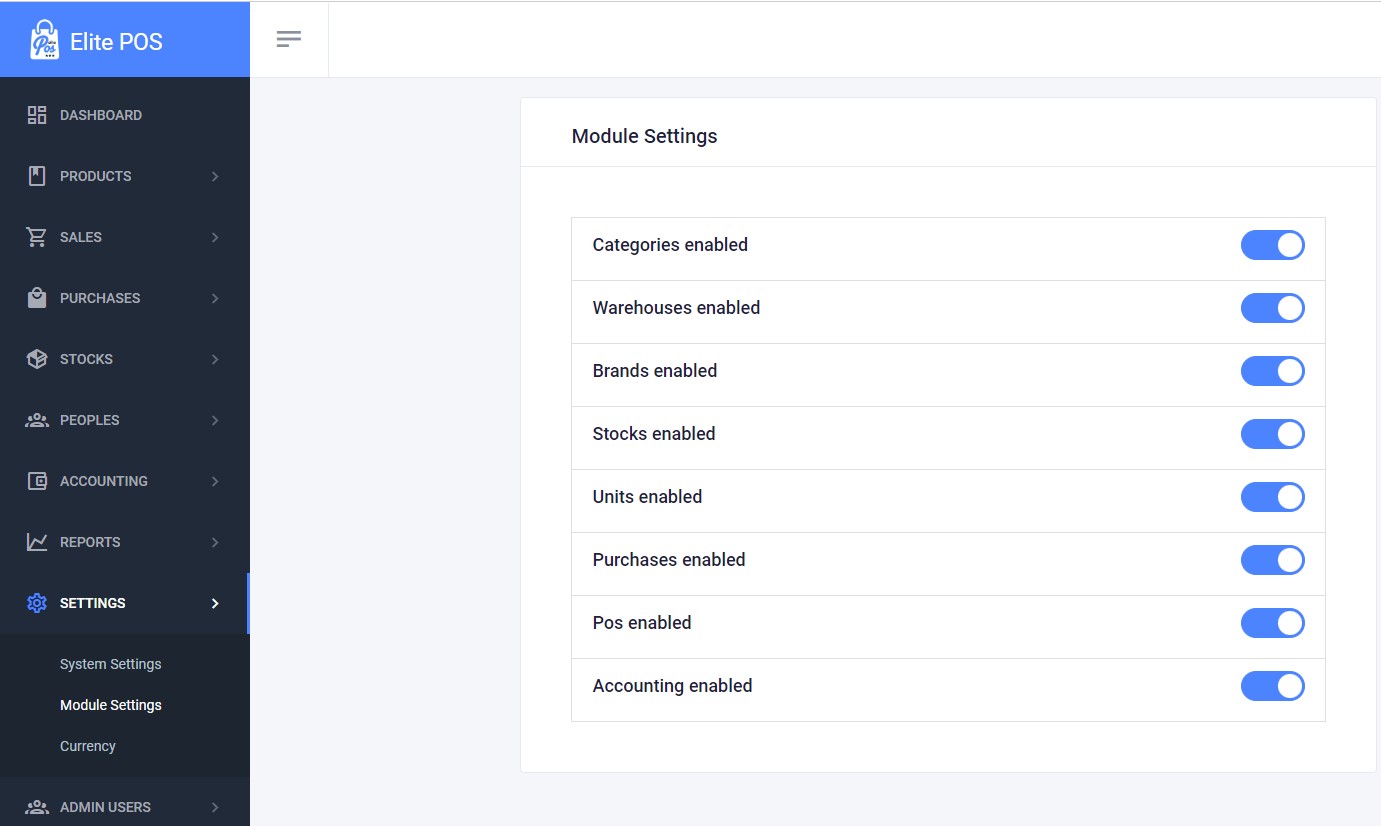
Module Settings
Module settings provide control over the activation and deactivation of various modules within your POS system. This includes enabling or disabling functionalities such as categories, warehouses, brands, stocks, units, purchases, POS, and accounting. It offers flexibility and customization based on the specific modules your business operation requires.
Currency Management
Managing different currencies is crucial for businesses operating in multiple countries or dealing with international clients. Currency management settings ensure that you can add and manage different currencies, set exchange rates, and make transactions in the currency preferred by your business or your customers.
Source & Credits
Backend :
- Laravel & Livewire Freameworks - https://laravel.com/
Themes:
- Sleek - Bootstrap Dashboard- https://themefisher.com/
- Documentation - IDocs
Scripts:
- jQuery - http://www.jquery.com/
- Bootstrap 4 - http://getbootstrap.com/
Support
If this documentation doesn't answer your questions, So, Please send us Email via Item Support Page
We are located in GMT +5:30 time zone and we answer all questions within 12-24 hours in weekdays. In some rare cases the waiting time can be to 48 hours. (except holiday seasons which might take longer).
Don’t forget to Rate this template
You can Rate & Review for our software.
Thank You.
Changelog
Version 1.0 (8 March, 2024)
Initial Release